No Comment

Make your Eyes Sharpen In photoshop Tutorial

Eye Sharpening – Photoshop Tutorial


eye sharpening Photoshop tutorial before and after image


With this tutorial you can create amazing, bright eyes within minutes.


amazing bright eyes how to tutorial


First retouch, adjust levels and do all necessary colour corrections on your image.


amazing bright eyes how to tutorial


With a Lasso Tool  (L) select the eyes (hold Shift key to add to selection). Hit Ctrl+J to copy selection to a new layer. You can copy the whole layer instead of selecting eyes but applying the filter to the large area like this may take a while on slower computers.


amazing bright eyes how to tutorial


Use Smart Sharpen filter on the eyes, the choice of right settings will depend on the size of your file.


eye sharpening Photoshop tutorial


Add a layer mask to the sharpened layer, then using a white soft brush on 50% bring back paint only iris’ and pupils to expose the sharpened eyes. Reduce opacity of the layer if it is obviously too sharp.


amazing bright eyes how to tutorial


Using levels brighten the whole picture and then copy mask from previous layer to select only eyes by holding Alt while dragging the sharpened mask (“layer 1″ in the pic) onto the “levels 2″ layer.


eye sharpening Photoshop tutorial


With a Colour Balance set desired eye colour, keep “Preserve Luminosity” ticked, again use copy of previously created mask to select eyes only.


eye sharpening Photoshop tutorial


Reduce opacity of the colour layer to make the eyes look more natural. Optionally go back to the other masked layers to find the best balance playing with opacity.


eye sharpening Photoshop tutorial

And voilà, the image is ready.
No Comment

Create a Poster Inspired by the Movie “The Bourne Legacy” PART 1

Preview of Final Results

image

The Bourne Legacy Movie Poster Photoshop Tutorial


Tutorial Resources


Step 1

Start by opening the photo into Photoshop. To open an image, go to File > Open. If you’ll be using the same image we used, we recommend downloading the highest resolution image because we will be cropping it in the middle of the tutorial.
image

Step 2

Right-click on the layer then click Convert to Smart Object. This will convert the layer into a Smart Object which lets us manipulate the image non-destructively.
image

Step 3

Before we start, we’re going to add a black layer below the photo layer. To do this, go to Layer > New Fill Layer > Solid Color. Select black as the color then click OK.
image

Step 4

In the Layers palette (Window > Layers), drag the Color Fill layer to the bottom. Rename the top layer to Photo and bottom layer to Background. To rename a layer, double-click on the text of the layer you want to rename.
image

Step 5

To begin, we’ll add a gritty photo effect with adjustment layers and filters. Start by adding a Black & White adjustment layer (Layer > New Adjustment Layer > Black & White) then change the blending mode of this layer to Overlay. Feel free to play around with the settings in the Properties panel (Window > Properties). This is an easy way of adding a grungy lighting effect and you can try it with your other photos. image

Step 6

Next, add a Vibrance adjustment layer (Layer > New Adjustment Layer > Vibrance). Reduce vibrance setting until it just has a hint of color.
image
Here’s what our image looks like after reducing the vibrance setting. image

Step 7

The adjustment layers gave it a grungy lighting effect but it also hides the detail and makes the background even darker. We don’t want to the photo to be too dark because it can blend in with the black background and make the stripes not very visible. To fix this, we’re going to apply a Shadows/Highlights adjustment. In the Layers panel, select the Photo layer then go to Image > Adjustments > Shadows/Highlights. Set the shadows to around 35% and highlights to around 15% then click OK.
image
If you look in the Layers palette, you can see that the adjustment was applied as a Smart Filter. This is because in Step 2, we changed the layer into a Smart Object. The benefit of using Smart Filters is that you can change the settings at any time without undoing a bunch of steps.
image

Step 8

Next, we’re going to add some grain to the photo using the Add Noise filter – which will be applied as a Smart Filter just like the previous step. Make sure you have the Photo layer selected then go to Filter > Noise > Add Noise. Checkmark the Monochromatic option then adjust the settings so that you get an effect like shown in the image below. Click OK to add the noise.
image

Step 9

Next, we’re going to crop and rotate the image. Select the Crop tool (C) then in the options bar, disable the “Delete Cropped Pixel” option. This will let us uncrop or make adjustments to the crop at any time. image Crop the image like shown in the image below. We also rotated the image so that the eyes are more horizontally aligned. This is important because when we add the stripes, we want to ensure that the eyes are visible and don’t tilt off the top or bottom edge of the stripes.
image

Step 10

Now we’re going to add some text to the image. We’re doing this first so that we know where to place the stripes later. In the Layers palette, select the top layer so that when you add the text, they all appear above the top layer. Select the Text tool then add some text around the image with each line of text in their own layer. The font used below is Arial.
image

Step 11

Select all the text layers (hold CTRL to select multiple layers) then add them to a group (Layer > Group Layers or Ctrl+G). Rename the group to Text.
image

No Comment

Create a Powerful Emotional Effect for Your Portraits in 9 Easy Step

What you’ll be creating

Quick-tip tutorial in 9 easy steps. Time to complete: 10 minutes. You will need Photoshop CS5 or newer to follow this tutorial.
final-results

Tutorial Resources

Step 1

Create a Curves Adjustment layer (Layer > New Adjustment Layer > Curves) then set the blending mode to Screen. Press D to set the colors to default. Click on the layer mask of the curves layer and press Ctrl + Backspace to fill the mask with black. With a round soft white brush paint over the eyes (make sure you have clicked the layer mask before painting). If the eyes are too bright lower the opacity (in this specific case I lowered the Opacity to 55%).
1
1b
1c

Step 2

Create a Black & White Adjustment layer (Layer > New Adjustment Layer > Black & White) and set the blending mode to Multiply.
2

Step 3

Press Ctrl + Shift + Alt + E to create a new layer from all the visible layers. Go to Image > Adjustments > Shadows/Highlights and play with the sliders in order to lighten the image a little bit. Drag the Highlights slider all the way to the left and drag the Shadows slider to the right until the image is a little bit lighter than before.
3
3b

Step 4

Press Ctrl + Shift + Alt + E to create a new layer from all the visible layers. Select the Dodge Tool (leave the default settings – Range: Midtones, Exposure: 50%) and paint over the following parts: eyes and especially the irises, tip of the nose, cheekbones, forehead, lips, tip of the chin, neck.
4

Step 5

Press Ctrl + Shift + Alt + E to create a new layer from all the visible layers. Go to Filter > Sharpen > Unsharp Mask. Use a 1-2px radius and 50-100% Amount to sharpen the image. Try to achieve a fairly mild sharpen effect – too much will make it look bad. You can also lower the Opacity to lower the effect.
5
5b

Step 6

Create a Hue/Saturation Adjustment layer (Layer > New Adjustment Layer > Hue/Saturation). Drag the slider to the left until the image is fairly desaturated.
6
6b

Step 7

Create a Gradient Map Adjustment layer (Layer > New Adjustment Layer > Gradient Map) with the default settings (black and white). Set the blending mode to Soft light. This will increase the contrast.
7
7b

Step 8

Create a Curves Adjustment Layer (Layer > New Adjustment Layer > Curves). Drag the right slider to the left in order to boost the highlights.
8
8b

Step 9

This step is optional, follow it only if you want to add a little artistic effect.
Create a Gradient Map Adjustment Layer and choose one of the colored presets. Set the blending mode to Soft Light and lower the Opacity if the effect is too strong.
 final-results[1]
9b
Below you can see some before and after comparison photos.
9c
OLYMPUS DIGITAL CAMERA

Final Results

final-results[2]
No Comment

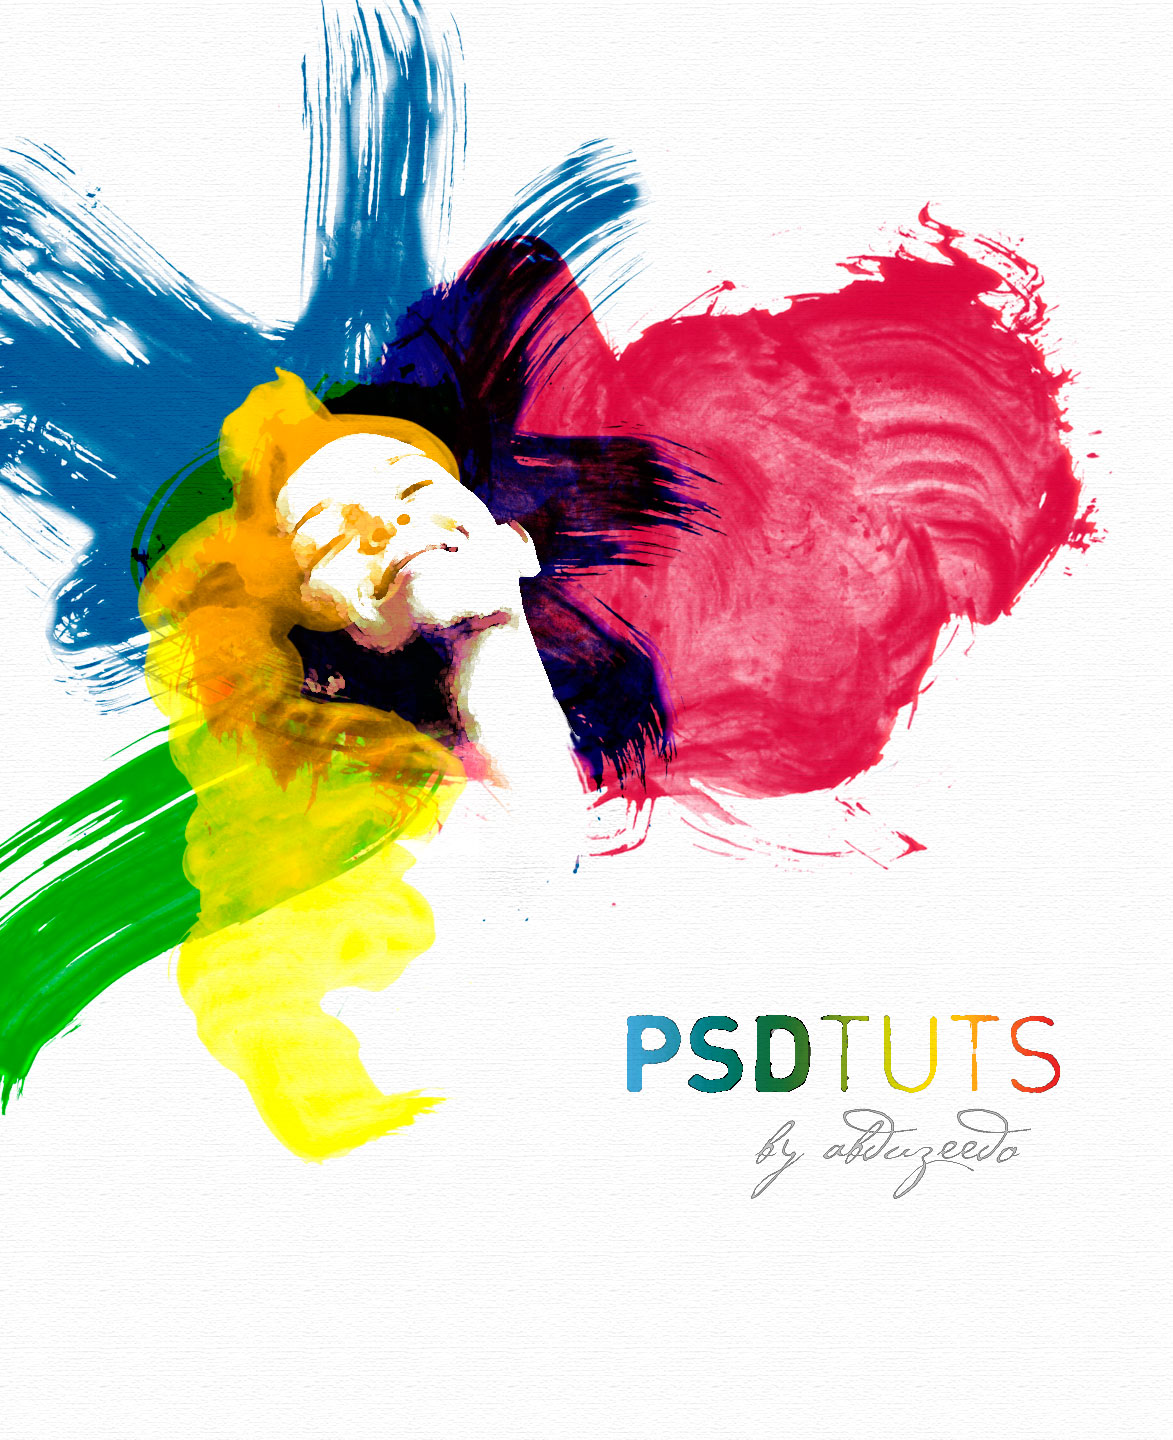
Cool Water Colour Effect Tutorial in Photoshop

Preview

Step 1

Create a new document and a new layer. Rename the layer to "texture" and fill it with white. Make sure that the foreground is white and the background is black. Then go to Filter>Texture>Texturizer, and use Canvas for the Texture, 80% Scaling, and 2 for the Relief.
Watercolor Effects in Photoshop

Step 2

Place an image in your document. The one used in this tutorial can be downloaded at this link. Then delete the background. You can use the Path Tool (P) or the Polygonal Lasso Tool (L). Tip: It doesn't need to be perfect because we will apply some filters in the next step.
Watercolor Effects in Photoshop

Step 3

Select the layer of the girl and go to Image>Adjustments>Levels. We want to increase the whites here. Then go to Image>Adjustments>Hue/Saturation, and change the Saturation to -65.
Watercolor Effects in Photoshop

Step 4

Now go to Filter>Artistic>Watercolor. Use the following settings: Brush Detail 9, Shadow Intensity 0, and Texture 1.
Watercolor Effects in Photoshop

Step 5

With the girl's layer selected, go to Layer>Layer Mask>Reveal All. Then select the Brush Tool (B), with black for the color, and mask the body of the girl.
Watercolor Effects in Photoshop

Step 6

We need the Bittbox Watercolor Brushes 2 that you can download at this link.
Next we create a new layer. Then with the Brush Tool (B) selected, choose the seventh brush from the BB Watercolor Brushes. Use black for the color. Then reduce its size to fit the document. After that, rotate and resize the layer. The idea is to create watercolor-style hair for the girl using the brush.
Watercolor Effects in Photoshop

Step 7

Now go to Layer>Layer Style>Blending Options. Change the Fill Opacity to 0. Then select the Color Overlay option. Use red for the color and Multiply for the blend mode. For the Opacity use 70%. Then select the Satin option. Use Hard Light for the blend mode, purple (#5d085c) for the color, 20º for the Angle, Distance 4px, and Size 12px.
Watercolor Effects in Photoshop

Step 8

Create a new layer. Then select another brush with the Brush Tool(B). I used the 17th Bittbox Brush. The concept we're using is to design different creative-looking hairstyles. So let's continue with that. On a new layer, paint some brush strokes in the middle of the screen. Then resize and rotate them until they look good. You should achieve a stylized hair look, as in the image below.
Watercolor Effects in Photoshop

Step 9

Go to Layer>Layer Style>Blending Options. Set the Fill Options to 0. Then add a Color Overlay. Use Overlay for the blend mode, Blue (#002cec) for the color, and set it to 50% Opacity. Then select Satin. Then use the following settings: a slightly darker blue (#065795) color, a Linear Burn for the blend mode, a 100% Opacity, a 19º Angle, an 11px Distance, and a 14px Size.
Watercolor Effects in Photoshop

Step 10

Let's brush in some more hair. This time we'll use green. Create a new layer, and select the Brush Tool(B). Then select another brush from the watercolor set. Select the last one, reduce its size, and paint more hair. Use just one click when brushing. After that you can resize and rotate it.
Now go to Layer>Layer Style>Blending Options. Again set the Fill Options to 0. Then add a Color Overlay, use Multiply for the blend mode, Green (#18ff00) for the color, and 100% for the Opacity. Then select Satin. Use the following settings: darker green (#0b9600), Darken for the blend mode, 100% Opacity, 19º Angle, 4px Distance, and 7px Size.
Watercolor Effects in Photoshop

Step 11

Next we repeat the process one more time. Create a new layer. Then select the Brush Tool(B). Select another brush, reduce its size, and paint more hair. Adjust it by resizing and rotating it until it looks good.
Again, go to Layer>Layer Style>Blending Options. Change the Fill Options to 0. Then add a Color Overlay, use Hard Light for the blend mode, yellow (#ffe400) for the color, and 100% for the Opacity. Then select Satin. Use the following settings: darker yellow (#a2a406), Color Burn for the blend mode, 100% Opacity, 19º Angle, 17px Distance, and 73px Size.
Watercolor Effects in Photoshop

Step 12

Now select the layer with the girl's face. Change the blend mode to Screen. Then make some adjustments, like fixing the neck using a regular brush with a white color.
Watercolor Effects in Photoshop

Step 13

Type the text you want; I typed Psdtuts+. Then go to Layer>Layer Style>Gradient Overlay. Create a gradient using Red, Yellow, Green, and Blue. Use 180º for the angle and Normal for the blend mode.
Create another layer, and make sure that the text is on top of this new layer. Then with the Rectangular Marquee Tool, create a rectangle selection and fill it with white. Next we merge these two layers (the text with the white rectangle). This is necessary to add some text effects; otherwise the filters wouldn't work well.
Watercolor Effects in Photoshop
Advertisement

Step 14

Now we apply some filters to the text. First go to Filter>Brush Strokes>Sprayed Strokes. Use Stroke Length 17, Spray Radius 0, and Stroke Direction Vertical. After that go to Filter>Artistic>Watercolor. Use the following settings: Brush Detail 11, Shadow Intensity 0, and texture 1. That will create a nice text effect, or you could experiment with different filters until you achieve optimal results.
Watercolor Effects in Photoshop

Conclusion

This tutorial presents a quick and easy way to create a nice design. We achieved this by mixing a photo with watercolor effects. We used some watercolor brushes and played with blend modes. Keep in mind though, if you can paint it for real, you will be able to create very original artwork, like the designers I mentioned before.
Watercolor Effects in Photoshop