No Comment

How These Sellers Made $50,000 on Fiverr


For many people, Fiverr® is a simple, effective way of making some extra money. The income they make from the site is supplementary and compliments the money they make at a day job. However, there are some Fiverr super sellers who hustle and grind their way to tens of thousands of dollars each year on the site. If you think it can’t be done, take a look at some of the Super Sellers below to see how they make it happen.

Harold Versus Student Loan Debt

Fiverr Super Seller Harold Everton finished graduate school with a mountain of student loan debt that he was sure would take years to pay off. But when he came across Fiverr, he found the perfect way to make some extra money though public speaking, something he was already good at. After spending all day working at a day job, Everton stays up late creating video testimonials for satisfied customers. He also engages with the Fiverr community on various forums and advertises his services on Craigslist to ensure he’s getting the word out about his business. The result: a booming online business and no more student loan debt.

A Full-Time Gig

Not all Gigs® are supplementary. In fact, some can be a full-time job that offers full-time pay. Fiverr-seller Katie was looking for a way out of a full-time job that she didn’t enjoy. She turned to Fiverr as a way to sell her talents as voiceover artist. Now she has over 10,000 completed orders and over $100,000 in earnings.
Her secrets: a goal of 100 percent customer satisfaction, promoting her business on social media, and making a personal connection with her customers.
“Fiverr has changed my life,” she writes. “The freedom to work when I want, doing what I want is the best thing about the site.”

Here’s Your Down Payment

In today’s economy, homeownership can seem like a difficult goal to attain. However, we know of one Fiverr seller whose hard work allowed him to come up with the down payment for his house.
Andy, a Top Rated Seller based in Denver, uses the site to promote his voiceover talents. He sees an average of 5 to 10 new orders each morning for a wide variety of projects, from video games to presentations. Andy estimates that 80 percent of his current income comes from Fiverr, which allows him to be the CEO and CFO of his own company instead of working for someone else. Like many other successful sellers, Andy prides himself on overdelivering to his customers, something that results in constant satisfaction.
“For me, Fiverr means freedom,” he writes. “It allows me to be what I’ve always wanted to be, an entrepreneur. Every day I get up and I’m so excited to use my voice to help other people.”

The Launchpad for a Global Business

Top Rated Seller Wayne Austin calls Peak District, England, home. It’s a small town without much going on, but Austin was still able to make big things happen with his design company using Fiverr. He regularly wakes up with 20 to 30 requests waiting for him in his inbox and is able to generate about $3,000 a month using the site.
Austin calls consistency and video the two keys to his success.
Regarding video, he writes, “You can read all the text someone has written for their Gigs, but buyers don’t really want to read. They want to watch a video and really engage with a potential seller. They want to hear you explain the service. When my buyers watch my videos, they understand what I offer, and they get a real sense of who I am as a person.”

Check out this Graphic Design Gig
100% Rating
Level 2 seller
Best Resposive rate
Aleenadesigns
No Comment

Text Portrait Effect in Photoshop Tutorial

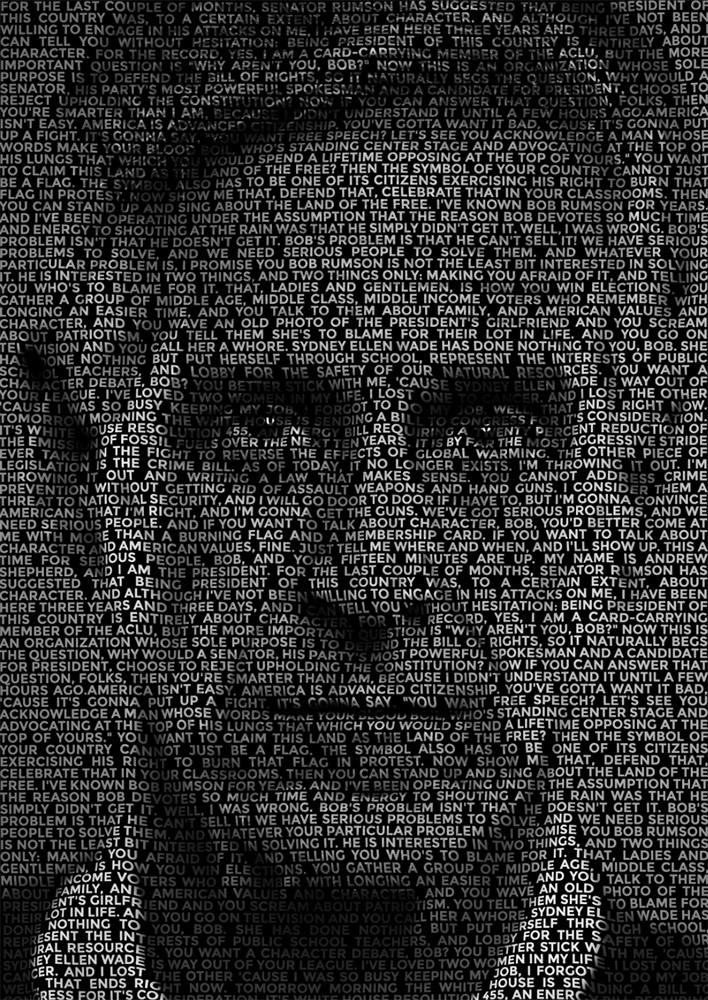
In today’s Photoshop tutorial we’re going to create a cool portrait effect using a long passage of text that bends and deforms around the contours of the face. Known as a Calligram, this effect is particularly powerful when used to present famous quotes or speeches by depicting the author/speaker with the actual words. Photoshop’s Displace filter is the key ingredient in this recipe which allows us to accurately wrap the text around the subject.


In my example, I’m combing a stock photo with a transcript of the speech from the movie The American President (1995) to create a totally fictional presidential address, but this calligram effect would be a great style for a series of famous speeches from the real American presidents of the past.


Begin with your chosen image in Photoshop. I’m using this stock portrait of a senior man from Shutterstock. Crop your image to fit into your final poster dimensions.

Add a Black and White Adjustment Layer and add more contrast to the image by darkening the Red channel. Unlike a normal Levels or Brightness/Contrast adjustment, altering the Red channel only produces some lovely tones.

Select the image layer then add a Gaussian Blur from the Filter menu. Enter around 20px for the radius. This blurring will help soften the displacement effect.

Go to File > Save As and save this document as displace.psd, then use the Step Backward shortcut of CMD+Alt+Z to undo the blurring effect.

Select the Type tool and draw a container across the entire document. Paste in your chosen quote/speech and delete any line breaks to leave a continuous wall of text. Turn off the Hyphenate option and select a Justified paragraph layout.

If the text doesn’t completely fill the image simply copy and paste the contents to fill out the required space. Select a font for your design, I’m using Montserrat Bold in uppercase. Reduce the text size and leading so the text densely covers the portrait.

With the text layer selected, go to Filter > Distort > Displace. Agree to Rasterize the type, then enter 10 in the Horizontal and Vertical scale options. After clicking OK, navigate to the displace.psd file we saved earlier.

CMD+Click the thumbnail of the displaced text layer to load its selection, then turn off the layer visibility. Go to Edit > Copy Merged (or CMD+Shift+C) to take a clipping of the face using the outline of the words.

Create a new document, which Photoshop will automatically size to the dimensions of your text clipping. Paste in the artwork, then fill the background with black to see the original portrait constructed out of tiny words that warp around the facial contours.
Text portrait effect
Thanks to the displacement effect, the portrait image is still clearly visible despite being made from a wall of text. From a distance it looks like a simple pattern overlay, but up close it becomes intriguing to read the tiny words that construct the image
No Comment

30 Worst Photoshop Mistakes World

The following pictures are selection of photoshop mistakes from magazines and advertisements that were in print and pretty pleased readers.


This August Vogue amputation of Claire Danes’ right leg.


An advert for Azoogle Ads – check out the shadow


This BlackMilk model with uniquely chiseled thighs.


Britney Spears’ “Work Bitch” cover. Look more closely at her torso: That cleavage was definitely airbrushed around in circles.

creepy-ad-AHHHHH

This creepy ad AHHHHH.

cut-and-paste-Photoshop-of-The-Voice-crew

This horrendous cut-and-paste Photoshop of The Voice crew. Don’t see it? Adam Levine seems to have brought the red carpet with him from another photo…

eBay The Secret To Smooth skin

eBay: The Secret To Smooth. Too much airbrushing has reduced this model to an anatomical mutant with no belly button.  Awkward!

ESPN-photo-at-Sochi-Olympic-Park

This ESPN photo at Sochi Olympic Park that *totally* happened.

fan-you-can-buy-on-Amazon

This demon fan you can buy on Amazon.

German hardware ad

This person with, er, mismatched feet in a German hardware ad.

H&M-model

This H&M model who has a serious case of Angelina Jolie leg.

Handbag

A gravity-defying handbag on a US shopping website

Huggies baby

This Huggies baby who’s grown a flesh tentacle.

inflatable-party-furniture

This inflatable party furniture that was definitely not photoshopped onto a stock photo of a backyard.

J.Crew featuring a child

This J.Crew featuring a child with AN INVISIBLE ARM.

Kerry-Washington’s-unrecognizable-Lucky-cover
Kerry is a flawless human being and one of the most gorgeous women on Earth. This cover does NOT represent that.

Matsushima-What-a-Waist

Somehow they slimmed this girl’s waist to a ludicrous degree.

Miranda Kerr’s neck

This butchering of Miranda Kerr’s neck on the cover of Marie Claire Australia.

Miyagi Prefecture Extra Hand

That extra hand must come in useful when cheating on exams.

movie poster for The Heat

The movie poster for The Heat, which seems to have been done on MS Paint.

New Zealand’s Creme magazine

This cringe-y pair of shorts on New Zealand’s Creme magazine.

pair of Gap shorts

This pair of Gap shorts that comes with a…knee growth?

Patrick Demarchelier Hip's Out of Joint

This looks like the model is holding someone else’s leg.  Hips are not supposed to be detachable, last time we checked.

Pixar Cars Hands Where We Can See Them

This box for an inflatable kiddie pool drew a lot of attention last Spring when astute shoppers noticed the inappropriate way the mom’s hand sort of disappeared into her son’s crotchal region.  Oops!

scary selfie lady in this ad

The scary selfie lady in this ad for Westfield Malls in Australia.

South Korea newswire image of President Park Geun-hye
This South Korea newswire image of President Park Geun-hye “shaking hands” with President Obama “at the White House.”

Tenerife Big Thumb

Somehow this girl’s thumb got stretched out to about six inches long. On the bright side, she’s awesome at hitchhiking!

Victoria’s Secret

This case of the contorted shoulder from Victoria’s Secret.
No Comment

Make your Eyes Sharpen In photoshop Tutorial

Eye Sharpening – Photoshop Tutorial


eye sharpening Photoshop tutorial before and after image


With this tutorial you can create amazing, bright eyes within minutes.


amazing bright eyes how to tutorial


First retouch, adjust levels and do all necessary colour corrections on your image.


amazing bright eyes how to tutorial


With a Lasso Tool  (L) select the eyes (hold Shift key to add to selection). Hit Ctrl+J to copy selection to a new layer. You can copy the whole layer instead of selecting eyes but applying the filter to the large area like this may take a while on slower computers.


amazing bright eyes how to tutorial


Use Smart Sharpen filter on the eyes, the choice of right settings will depend on the size of your file.


eye sharpening Photoshop tutorial


Add a layer mask to the sharpened layer, then using a white soft brush on 50% bring back paint only iris’ and pupils to expose the sharpened eyes. Reduce opacity of the layer if it is obviously too sharp.


amazing bright eyes how to tutorial


Using levels brighten the whole picture and then copy mask from previous layer to select only eyes by holding Alt while dragging the sharpened mask (“layer 1″ in the pic) onto the “levels 2″ layer.


eye sharpening Photoshop tutorial


With a Colour Balance set desired eye colour, keep “Preserve Luminosity” ticked, again use copy of previously created mask to select eyes only.


eye sharpening Photoshop tutorial


Reduce opacity of the colour layer to make the eyes look more natural. Optionally go back to the other masked layers to find the best balance playing with opacity.


eye sharpening Photoshop tutorial

And voilà, the image is ready.
1 Comment

Adobe Photoshop CC 2014 tutorial for beginners

Adobe Photoshop needs no introduction. It is among the most powerful and preferred photo editing software available for Windows. As time goes by Adobe keep adding new and useful tools for those Photoshop enthusiast and hence Adobe Photoshop CC 2014 came into existence. In this post, we will have a look at Adobe Photoshop CC 2014  new features and getting started tutorial for beginners.

Adobe Photoshop CC 2014 new features

Photoshop CC 2014 has new features like 3D printing, 3D imaging, Linked Smart Object improvements, Smart Guides, layers comps in Smart Objects, Blur Gallery motion effects, selection of image areas in focus, content-aware feature with color blending, enhancements to Photoshop Generator, font sync feature from Typkit etc.
If you are new to Photoshop, looking to try your hands on Photoshop then this tutorial is for you, keep reading further to learn how to begin with Adobe Photoshop CC 2014, Catch us after the jump !
Photoshop CC2014 600x508 Adobe Photoshop CC 2014 tutorial for beginners
Before you begin using Photoshop CC 2014, you have to either purchase the product or have to sign up for the trial version which last for 30 days and also check the basic system requirements for the product to install.

Adobe Photoshop CC 2014 system requirements

Intel Pentium 4 or AMD 64 bit processor, Microsoft Windows 7 SP1, Windows 8 or Windows 8.1, 2GB of RAM (8GB recommended), at least 2 GB of hard disk space, display monitor which supports 1024×768 display (1280×800 recommended) and a decent internet connection to download and install the application.

How to Install Adobe Photoshop CC 2014

  • If you have purchased the product already or signed up for the trial, then go to this link to download the Creative Cloud installer. To download or update any Adobe Creative Cloud product a user must have to download the installer then only it will show you an option to install Adobe Photoshop CC 2014. We have already talked about Adobe Creative Cloud.
  • Install the Adobe Creative Cloud installer, sign in with your Adobe ID and select Photoshop CC 2014 to install.
  • Based on your internet connection speed, Photoshop CC 2014 setup file will be downloaded and installed.

Adobe Photoshop CC 2014 beginners tutorial

Create a New Photoshop File

Launch the Photoshop application, then go to File ->New -> Give a name to the file, select width and height and hit OK. The width and height of the file can also be changed by going to Image ->Image size option.
New File Photoshop 600x324 Adobe Photoshop CC 2014 tutorial for beginners
Now, to create objects or a diagram in Photoshop, use the Tools panel, which appears on the left hand side. It is used to create different artwork such as text boxes, rectangular box. The layers, color, paragraph, swatches, brush panels usually appears in the right side of the Photoshop application.

Enable hidden panels in Photoshop CC 2014

By default Adobe Photoshop CC 2014 loads up with all panels and tools option. But in case you do not see any options like Tools, Layers, Stroke, Colour, Swatches or Brush panel options, then simply navigate to windows menu and select the respective option that you are looking for and it will be there on the screen.
hidden panel photoshop 600x324 Adobe Photoshop CC 2014 tutorial for beginners
Those panels can be moved or customized according to user requirement and can be also saved as a Workspace. Workspace are component which stores user-defined presets.

How to print a Photoshop File

To print a Photoshop file, we usually prefer a decent color printer as we create high quality Photoshop files which requires a decent printer to print. To print a file, go to File menu -> Print-> Select printer -> Customize the color profile settings on your printer, so that you will get desired output and hit the Print button.
print photoshop 600x324 Adobe Photoshop CC 2014 tutorial for beginners
Among all Adobe programs, Photoshop is one the best and widely used application in the world. It is widely used by teenagers to a Photoshop geek – although getting used to it, does take a little time.
As we had mentioned earlier, we normally do not talk about shareware, preferring to talk about free software instead. While there are several free photo editing software, none come close to Adobe Photoshop. Hence we decide to cover a beginners tutorial